잡동사니
[Jenkins] CI(Continous Integration) 환경 구성하기 본문
안녕하세요. yeTi입니다.
오늘은 Jenkins를 활용하여 CI(Continous Integration) 환경을 구성해보겠습니다.
설치 환경
- Jenkins : 2.164.2
- Git : Bonobo 6.3.0
- Gradle : 4.5
- Slack : https://slack.com/intl/en-kr/
개략적인 흐름은 다음과 같습니다.

<그림 1>의 흐름은 다음과 같습니다.
- 개발자는 소스를 Git에 push 한다.
- Git은 hook을 하여 Jenkins에 빌드 시작을 알린다.
- Jenkins는 소스를 빌드하고 테스트한 후 성공시 WAR를 생성한다.
- Jenkins는 Slack으로 빌드 결과, 테스트 결과, Commit log를 알린다.
1. Git 연결
Repositories에 Git 서버 정보를 설정하고 빌드할 branch를 설정합니다.

2. Git hooks 설정
Git에서 접근할 Authentication Token을 설정하고 Git에 post-receive hook을 설정합니다.

Git 서버에 post-receive를 설정합니다.
(경로 예시 : C:\inetpub\wwwroot\git\App_Data\Repositories\BackEnd_Member\hooks)
#!/bin/sh
echo Notifying Jenkins Server - API Server, Develop branch
while read oldrev newrev refname
do
branch=$(git rev-parse --symbolic --abbrev-ref $refname)
if [ "develop" == "$branch" ]; then
c:/curl-7.64.1-win64-mingw/bin/curl --user admin:fnqlr2018! -s "http://localhost:10101/job/CI-APIServer(develop)/build?token=[Authentication Token]"
fi
done
3. Build 환경 설정
소스를 빌드할 환경을 설정합니다.

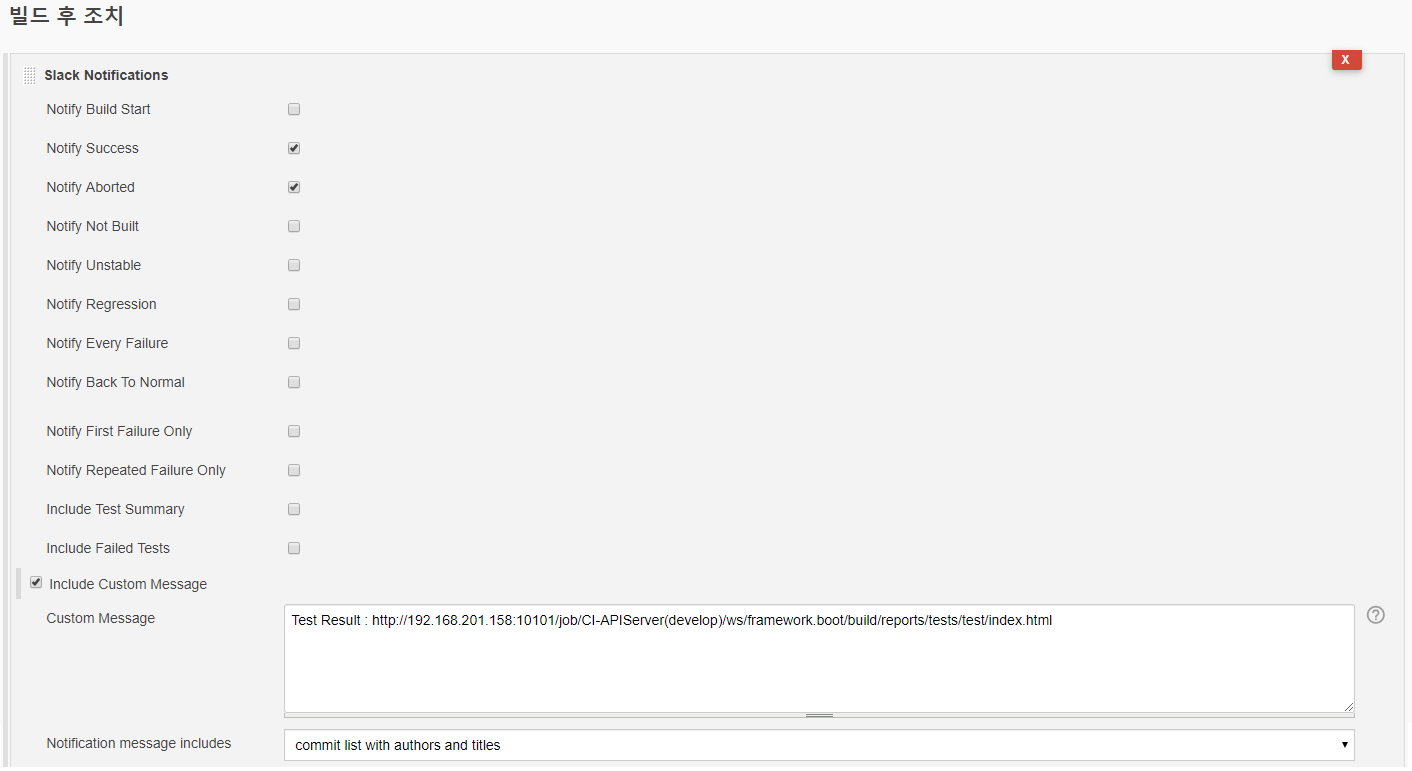
4. Slack 설정
Slack을 활용하여 성공과 실패에 대한 알림을 받도록 하고
Test 결과 및 Commit log를 받도록 설정합니다.

5. Git 서버의 develop branch에 push하면 다음과 같이 Slack의 알림을 받을 수 있습니다.

관련 글
[Jenkins] 배포서버를 선택하여 빌드하기
안녕하세요. yeTi입니다. 오늘은 Jenkins에서 배포서버를 선택하여 배포하는 설정에 대해 알아보겠습니다. 이전 글 2018/11/26 - [분류 전체보기] - [Jenkins] SVN 연결하기 2018/11/26 - [IT/소프트웨어 공학] -..
yeti.tistory.com
'IT > 소프트웨어 공학' 카테고리의 다른 글
| 협업툴 잘 쓰는법 (feat. 슬랙, 지라, 메일) (0) | 2022.08.04 |
|---|---|
| GoF 디자인 패턴 수강 후기 (feat. Youtube) (0) | 2022.06.17 |
| [Jenkins] Gradle 연결하기 (0) | 2018.11.26 |
| [Jenkins] SVN 연결하기 (0) | 2018.11.26 |
| [Jenkins] 배포서버를 선택하여 빌드하기 (0) | 2018.08.03 |
Comments


